In the previous post, we successfully pushed our source code to Github, and leveraged Github Pages to host our blog. We also explored Github action to set up an automatic build pipeline for our blog. In this tutorial we will learn how to deploy our blog using our own domain while still leveraging all of the tools Github provides.
Domain purchase
There are many services from which you could buy a domain. Personally I don’t have much experience with this, but namecheap was recommended by my friend some times ago. I bought some domains from namecheap before, and the price for a 1 year subscription is around $10. Depending on what domain you desire the price could be lower, or higher. Some domains may even cost you $100 per year. So let’s grab a domain of your choice, and we will continue this tutorial. In the next section we’ll explore how to configure the newly bought domain so that it works well with your Github pages.
Domain DNS configuration
Depending on your source of purchase you will have a different way, and different UI to manage your domain. However, it must be possible to update your domain DNS. If you’re using namecheap, simply click on Domain List in the main dashboard UI, you should be greeted with a list of your bought domains. Then click Manage button next to the domain you want to configure for this personal blog.
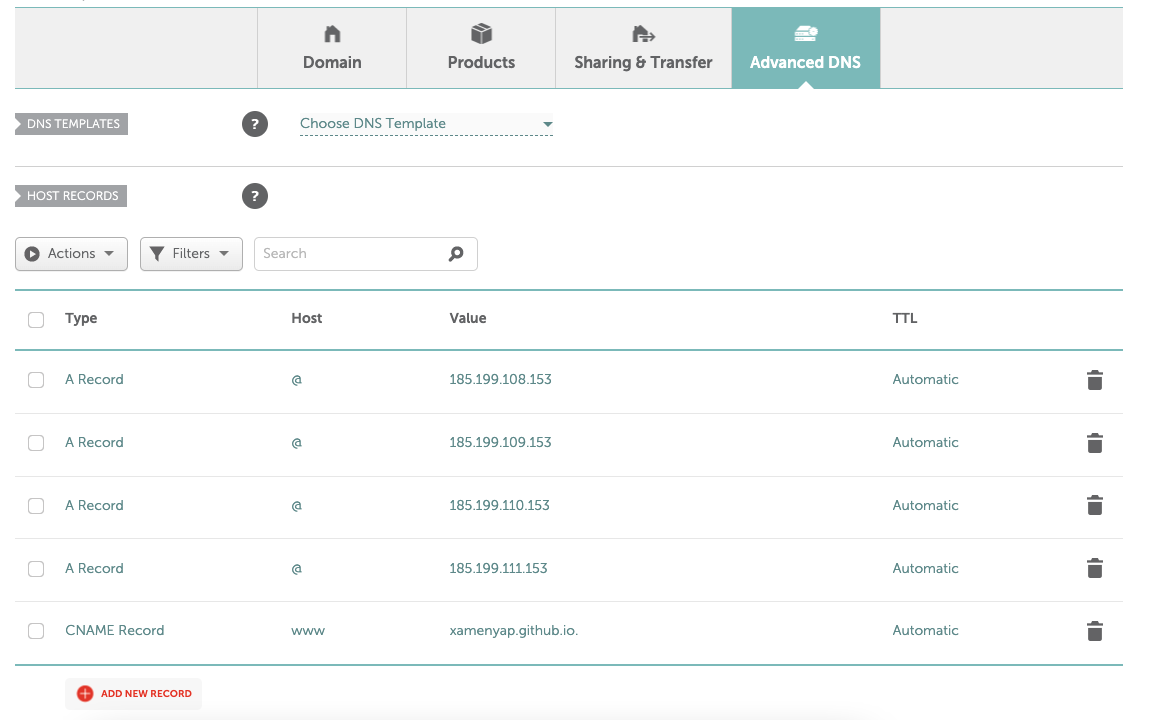
After that you should click on the Advanced DNS tab. Under Host records, you should create 4 A records with the host being @, and value being 185.199.108.153, 185.199.109.153, 185.199.110.153, 185.199.111.153 respectively. Additionally you will have to create a CNAME record with host being www and value being {yourGithubName}.github.io. It should look like this after you finish
Source code update
The next thing to do, is to update baseURL parameter in the config file located at config.toml, simply update the link to point to the domain you bought earlier. For me, it was sunkeneyes.dev so it’s like this
baseURL = https://sunkeneyes.dev
Commit your changes, and push it to your remote branch just like we did multiple times before
$ git add .
$ git commit -m "Update baseURL in config file, using custom domain"
$ git push -u origin master
Github pages update
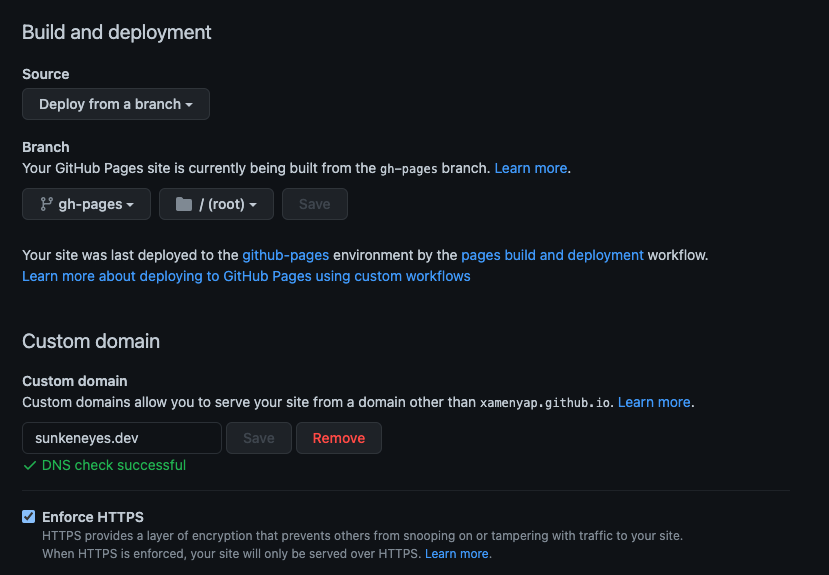
Finally you will have to update the Github Pages Settings. Under Custome domain enter the domain you bought. Click Save and wait for DNS check. You should also enable Enforce HTTPS. Do not worry about buying an SSL certificate as all Github Pages, including the ones using customer domains, support HTTPS out of the box. Keep other configurations unchanged. It should look like this
Congratulations! You have finished the long tutorial that spans 3 parts. Your personal blog is now live, but you can take some times to check out Hugo documents to customize your blog even more.